Garden Update: First Week of May

There has been a lot of growing going on in our backyard — I can’t wait for harvest time to start enjoying our veggies and fruits, do some canning with friends and family, and feed my family lots of wonderful, homegrown food!


Imagine about 40 of these babies and you’ll get an approximation of what we have in the backyard. From the original 72 plants I grew from seed, I gave some away and donated some to my youngest’s school. I figure a few are not going to make it, but the truth is, I need to buy more cages — eek!


We grow some of our strawberries on the top of those upside-down hanging tomato planters. Last year we got lots of berries and lots of tomatoes, so we’re going for it again. A friend gave me another planter so hopefully they both do well.


My roses make me smile every time I go out to the backyard. I think some of them are going to decorate our home this week.


Our plum tree will give us lots of sweet, juicy plums this year. Plum jam is a pain to make but just so good!


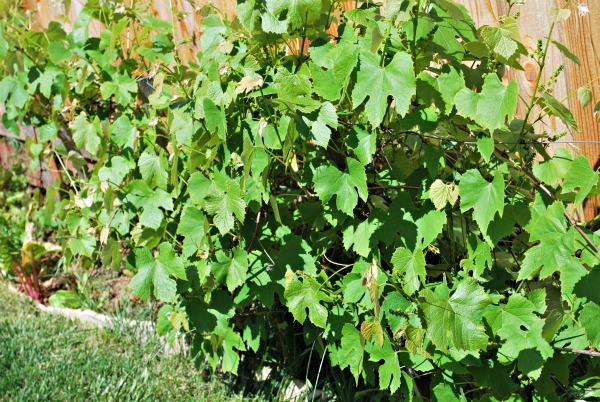
There are hundreds (thousands?) of tiny grapes, the size of a pin’s head, all clustered and green right now. They’re Concord grapes, and once they’re ripe, my boys love to run around the backyard, scooping up a few each time they pass the grapevine.


I had never heard of Swiss Chard until I read Animal, Vegetable, Miracle — and no wonder Barbara Kingsolver likes it so much! We bought the plants once, three years ago. It just comes back on its own. I did get some Chard seeds for my 40th, so I’ve added to Chard Row.


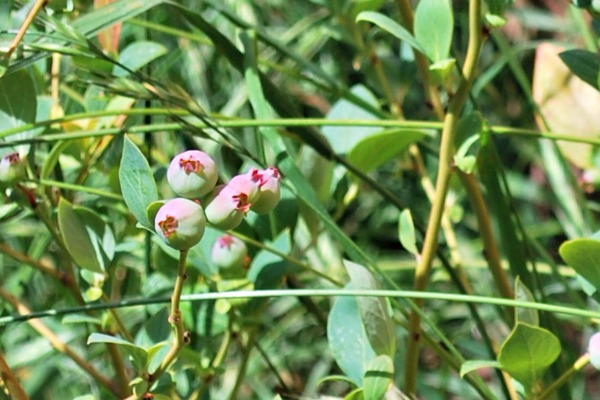
One of my favorite fruits to eat as I’m working in the backyard are blueberries. I’ll be weeding for half an hour or pulling tomatoes off their plants and run over to grab a few blueberries. Then the boys see me and pretty much empty the plant of its fruits within 10 minutes. And hey, that’s why I grow stuff, right?

I have lots more to show you in the next Garden Update – peas, broccoli, corn, carrots, beans, etc. Stay tuned!

Downton Martha garden file box

I saw this idea on The Martha’s website the other day and decided to make something similar. Alas, at the time I was watching Downton Abbey, so you see, the end result is something of a hybrid ;D

We had a spare DVD storage box that I appropriated for this project, and covered in gorgeous 18-century floral print wrapping paper that I got from a book on clearance. Score! It has a few different prints so I used two, the lighter one to cover the box, and the darker one for the cardstock dividers.

I made the Seeds sign with stickers I had leftover from my craft table project. Since this file box will be outside some of the time, I added some wide packing tape to the edges of the box, the Seeds sign and the dividers, to protect the printed paper. I had some bias tape that coordinated with the paper, so I made handles for the box and added a ribbon detail to the top of the box, with a cute button on the Seeds sign.

The seed packets are attached (once empty) to plain index cards where I can write down how well they did, where they were planted, etc. I have a spreadsheet I use for my garden plans but I had been holding on to the empty seed envelopes because I didn’t want to throw them away. Now I have a pretty box to store them in and add information for future plantings.

Hope you enjoyed this Downton / Martha inspired craft!

And two days later . . .

OMG I can’t tell you how psyched I was to go in to visit my little seedlings and see that a few have started sprouting!!!

This morning there were about 4-5 little sprouts and this afternoon there were a whole bunch! These are the broccoli seedlings – they are getting some sun through my little one’s bedroom window, but my husband suggested we get some lights put up in the garage so the seedlings can have more light throughout the day and not be at the mercy of the cats. More on that next week!

Starting the seedlings


Last year I decided that I would start most of my garden from seed this planting season. First, there is so much more variety in buying seeds compared to the seedlings from the local stores. Don’t get me wrong, I have been super happy with our local purchases, but I wanted to try some more heirloom varieties. Second, it is much cheaper. Well, in this case, so far, my seeds have been free because they were given to me by many lovely people for my 40th birthday. See, I can type that now (40th birthday) and not sigh mournfully. Most of the time.

Anyway! I will still be purchasing potato sets because they were so delicious when we grew them last year. If I have space, that is, because one packet of seeds becomes quite a few seedlings. Even the rarer heirloom seeds, which only are about 25 seeds per packet, become about 8-12 seedlings, since you are supposed to do 2-3 seeds per slot.

As part of my birthday haul, I got a gift card with which I purchased a peat pellet starter tray. I knew it wouldn’t be enough for all the seeds I have that I needed to be started indoors, but I had also saved a couple of smaller trays last year and we had a few disposable containers. People start seedlings in cut-off plastic bottles or milk jugs, etc. so honestly, you don’t even need to get a starter tray like I did. I by no means pretend to be an expert at this, this is my first time starting most of my plants from seed and hopefully what I do will work, and I’ll share my triumphs and failures with you.

These are the seeds I needed to start indoors – a few tomatoes, eggplant, broccoli, onion, and bell peppers.

If you have a starter tray, then you need to soak the pellets.

They will expand and then you can add the seeds.

This whole tray was taken up by my tomato seeds. I took pics so I’d remember what was in each tray because I didn’t have labels ready 😀 The envelope straight up means one row, on its side means two rows, so this tray has 1 row of Super Sweet 100, 2 rows of Principe Borghese, 1 row of Black Krim, and 2 rows of Pink Brandywine.

Hopefully we will have lots of onion this year!

The rest of the onion seeds, peppers and eggplant

Broccoli

In a few weeks they should be ready to transplant, knock on wood. I have LOTS more seed packets, but they are to be started outdoors once the danger of frost is past. Around here, that means late February. However, we are going to be super busy so I have a feeling those babies will be planted in early March.

Garden planning time!

A few years ago I decided to start growing veggies in my backyard. My dear husband raised an eyebrow (I had abandoned projects a few times) but nonetheless supported my new endeavor, going to the garden store, helping me till the soil, planting rows of seedlings with me, etc.

Here is one of the rows of corn we planted last year:

Some of our strawberries and peas:

For my 40th birthday, I asked people (those who asked what I wanted) for garden seeds. I got so many that I need to make the best use of the space I have and probably will need to grow some in containers.


We know by now where our tomatoes grow best, that the area by the deck is the Row of Death because nothing grows there — meaning we’ll probably do a row of containers there — and that our strawberries need to be high up off the ground or else the snails will get to them before we do. But it is always good to read up as much as you can, especially if you’re a novice like me. I like the idea of grouping items either because they’re all the same type, i.e. greens like lettuces, chard, spinach, or by theme.

I found some free garden plans at BHG.com and thought I’d share them with you in case you haven’t seen them already. Some of my favorite layouts are:

The Salad Greens Garden

The Heritage Vegetable Garden

Inspired by Italy Garden

There are many more garden plans with detailed layouts as to the specific plants and how many, what zones each plant is appropriate for, etc. Some of these may not fit exactly with the seeds I have or the size of the area where they’ll be planted, but they are great guidelines and have already given me some ideas for this year’s garden.

Are you planting anything this year?


Thanksgiving Mantel

As you might have seen in my silly turkey garland post, our mantel has been de-Halloween-ed and is now ready for Thanksgiving. But last Thursday the boys and I made a little something to add up there.

I got the inspiration for this from pinterest, of course, but I decided to make this craft with stuff I had on hand.

I have been saving glass jars for the past few months, I’m trying to replace plastic food storage as much as I can, and I had a few pasta sauce jars that weren’t all the same size but they worked in a group.

Then I added a band made of scrapbook paper, created the letters and border on Photoshop, and added some curling ribbon. The contents of the jars are dried out corn husks and stems from my backyard.

I think it looks nice atop my dark mantel:

As you can tell, my boys have started to pick off some of the poor turkeys’ eyes and even one of the faces (look to the right end of the garland). As long as they don’t eat them, I’m fine with it 😀 The dried sunflowers on the right are also from my backyard, we got tons of seeds, so yummy!

Hope you have a great Monday!

Tip Junkie handmade projects

Garden update – August 2011

We haven’t had as many of these as we have in years past:

0808avocado

But just a few are definitely welcome! I hate buying them at the store, I always get ones that are half-rotted inside.

We’ve had so many delicious salads thanks to our cherry tomatoes

0808cherrytom

I like to keep it simple and refreshing with some mozzarella cheese and fresh basil.

Some impatiens joined our front yard and this little screen in the backyard

0808impatiens

Lots of pumpkins are making their appearances!

0808pumpkin2

0808pumpkin

And lots of bigger tomatoes to be harvested in the next couple of days

0808tomatoes

And the kids’ favorites – strawberries!

0808strawb

We keep getting corn, onions, and a small zucchini is making its appearance – hope it is ready to harvest soon!

A wreath on my door

I love the smell of lavender. I am lucky enough to have some growing in my backyard. I have made sachets to give as gifts before but I decided it was time to make a nice wreath for my front door.

I started with a wreath form and floral wire, both totaled under $5 at Walmart:
0715wreath1

My lovely lavender sat to the side while I arranged stems on the wreath form:
0713lav2

Halfway done – I decided I like really full wreaths, and considering buds will fall off, I wanted to add more to this:
0715wreath2

The finished wreath perfumes my front door, I don’t know why I didn’t do this earlier, it was so easy and cost so little!
0718wreath3

I have lots of lavender left over, so I can still make my usual sachet gifts, which people love to receive.

Hope you enjoyed this craft!


The Girl Creativehandmade projectsGood Life WednesdaysWeekend Bloggy Reading