How Steve made the Gipsy Danger costume

A few of you have asked how Steve made our son’s costume from the movie Pacific Rim – I asked him to write down an overview of the process.

Disclaimer 1 – he’s not a newbie. He’s been making costumes for a few years now and while some of the techniques were new to him, he’s always been good at putting things together. There is no way I could make something like this. I can sew and knit and make jewelry, but I’ve never made stuff like this.

Disclaimer 2 – he’ll be traveling for work in the upcoming days and won’t be available for any further or more detailed explanation. There are a lot of good tutorials on YouTube for building armor like this out of foam, and some cosplayers are very good at sharing their techniques as well.

Here it goes:

I started the build using a program called pepakura that ‘unwraps’ 3D images into their component sections. There is an artist on http://www.therpf.com which is the Replica Props Forum – a home for cosplay and movie prop reproductions. He ‘built’ the model for Gypsy Danger and I used this to print out the helmet. I printed it on cardstock and assembly was pretty easy with hot glue.

Once I had a basic shape and size for the helmet, I then used EVA foam mats which are the anti-fatigue floor mats that you can buy at Home Depot or Lowes or other home-improvement stores. If you find these on sale, STOCK UP! They aren’t cheap and you will go through them… I cut the foam mats into parts and bits and used hot glue to bond them. Almost all of this was done by eye. I wasn’t going for an EXACT duplicate of the movie, but a close approximation.

Here is someone that did a complete screen-accurate build – http://www.therpf.com/showthread.php?t=191528&p=3267895&viewfull=1#post3267895

I followed many of the online tutorials for cosplay armor of Master Chef (Halo), Iron Man, and a few others. The real key is using a heat gun (not a blow dryer or embossing tool but the actual ~$30 one you buy at the hardware store) to heat mold parts into curves.

For the lights, I bought some very cheap book-lights from a Dollar Store. I glued these in place with hot-glue.

I sealed the foam with a glue wash (50% white glue / 50% water) for some sections and spray rubber (FlexiSeal or equivalent) for other spots that I needed to cover some bad seams with filler. Then I painted the entire thing in a base coat of exterior latex paint. This gives the armor a consistent and smooth coating. Over that, I used auto-body spray paint that had a slight metallic reflection. The movie Gypsy Danger was more of a naval battleship blue, but my son wanted it more metallic.

The visor was a bit of yellow plastic sheeting from the old-school notebook dividers that one uses in primary school – Like these – http://www.staples-3p.com/s7/is/image/Staples/s0204755_sc7?$splssku$

Under the entire suit, he wore a black turtleneck and black stretchpants that I picked up at the sporting goods store. While I was there, I spotted some Lacrosse gloves that were close to Gypsy Danger’s gauntlets, so I grabbed them (most expensive part of this build) and painted them the same way as the rest of the costume.

Also for the chest, I used an old CPU fan and powered it with a 9V battery so it would spin. 🙂

The build took me about 50 hours over the course of 2 weeks and I didn’t finish until the Halloween Morning. But I was learning through trial and error and that cost me a lot of time.

All the best!!!

Steve
A New Milestone

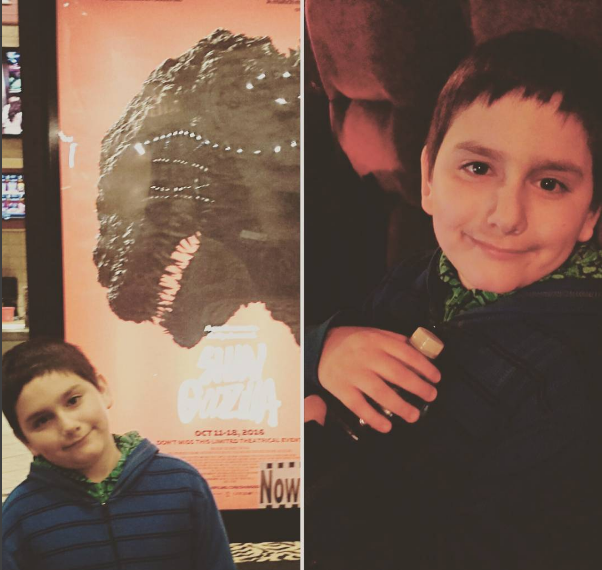
Last night our youngest accomplished something for the first time in his ten years of life.  He went to the movie theater.

Because of his sensitivity to noise, he was never able to tolerate the loud sound of a movie theater and has had to wait until movies he wanted were out on DVD or available online to see them.

Only one giant, terrifying creature, the King of the Monsters himself, could get Alexander to try this new challenge:

godzilla

Alexander has been waiting for this new movie, a Japanese release called Godzilla Resurgence, or Shin Godzilla; has learned to write the title in Japanese, and has made his own video trailers in anticipation of the movie.  Needless to say, this was a big deal for him.

The four of us booked our tickets and got ready to support Alex through his first movie theater experience.  He was thrilled to see the poster inside the theater and had his picture taken, he kept looking at me and smiling, thrilled to be watching his favorite movie character, and he was polite and quiet during the whole movie.

1014movie

This morning, he was still raving about the experience, calling it “the best thing I’ve ever done.”

We’re proud of Alex, and of Aidan for being such a supportive brother, encouraging Alex and reassuring him so his little brother would have a good experience.

And yes, we will be getting the DVD when it comes out.


DVD storage solution

We didn’t use to own many DVDs. Then we had kids. Then we got chubby. So now we have ton of kids’ DVDs and, since we got our XBox, games and workout DVDs. There were DVDs everywhere, a couple even got damaged because they would be thrown into a drawer with no sleeve or case, so I started to look for a system that would work for us. I wanted things to be organized and for our boys to be able to see where their own DVDs went.

I ended up going with these mini binders from Atlantic:

I bought two – with 4 binders each – and LOVE LOVE LOVE them. Plain old grown-up movies are labeled alphabetically, with room for more should we purchase DVDs in the future. The rest are labeled “misc.”, “kids”, “workout”, and “xbox”. There is room for almost 200 DVDs in these binders and they are all neat and organized.

As you can see, we do save cases for movie collections like Star Wars and Lord of the Rings, but all the cases from the movies stored in the binders are up in our attic storage, lessening the bulk and frustration of finding a case only to open it and see that the DVD is not inside.

Above the DVD shelf live our votives and wax melts.

I made the little boxes out of chevron tape and one mini-corn dog box (my oldest is addicted!), because, again, the wax melts were all over the place, and the burner is to the left of this cabinet.

Now I need to tackle the CDs. Holy crackers, that is going to be a huge job – I’ll report back in a year or two.

katherines corner

Girl Crush: Alison Pill

I first saw actress Alison Pill in The Pillars of the Earth, playing Princess Maud/Empress Matilda:

source
I thought her portrayal was gutsy, and a highlight of the production. Then I watched one of my all time favorite movies, Midnight in Paris, and was delighted to see her, completely transformed, as Zelda Fitzgerald:

source
Her accent was spot on, and her performance, which could have been over the top, was instead very nuanced and bittersweet. And yes, that’s Loki as F. Scott Fitzgerald.

A week ago, I decided to check out The Newsroom, the fabulous new (to me) show from Aaron Sorkin. You must understand that I am hopelessly behind on new TV shows so please indulge me in my fantasy that this show is brand new.

Luckily, HBO ran a marathon — which showed me just how behind I really am — of episodes and I was able to catch up and wonder, I guess along with others, if Jim Harper was purposely named as such, given his Jim Halpert -like role. Anyway, to my surprise, there was talented Miss Alison as earnest production assistant Maggie Jordan, torn between arrogant and hot producer Don “eat me” Kiefer and rumpled good guy Jim Halpert. Sorry, Jim Harper. And no, I’m probably not caught up yet so don’t spoil it for me, please!

source
Another “The Office ” tie in is that the actress playing Lisa, Maggie’s roommate and Jim’s unwanted girlfriend, played Dwight Schrute’s one time love interest Isabel.

Okay, so I’m not the only one thinking this Jim Halpert/Jim Harper thing is weird/confusing/intentional? Gotta love Google.

Dear Miss Alison, I am sorry this post that was intended to be All About You got derailed by the Jims Conspiracy. I think you are a brilliant actress and look forward to seeing you in many more awesome projects. Sincerely, Me.