Past Project: Birthday Cakes

Around here, it’s the man’s job to do birthday cakes.  That’s right, my husband has created some fabulous cakes for our boys’ parties.  It must be genetic because his mom was in charge of cakes for the first couple of years, but then as our boys’ preferences have evolved, my husband decided he’d give cake decorating a try.  His mom still bakes them — they’re so good! — and my husband plans out the logistics of transforming a plain cake into a dinosaur, Godzilla, or whatever the boys are into.

Let me show you some of their talented creations:


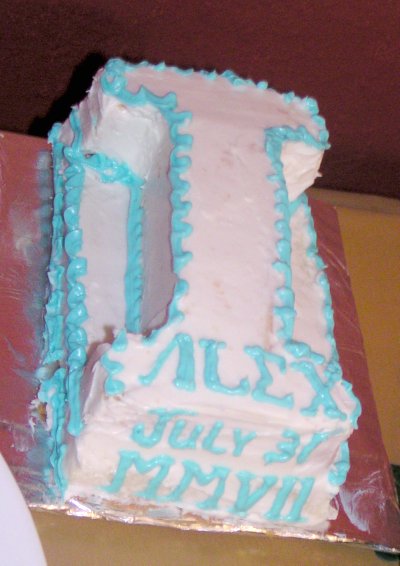
This was the cake for my youngest’s first birthday. It was a toga party, so my mother-in-law make a cool cake with lettering to match the invitation.

When my oldest turned 3, he was totally into elephants and Go, Diego, Go! So gran made him an elephant cake and I found a Diego candle topper:

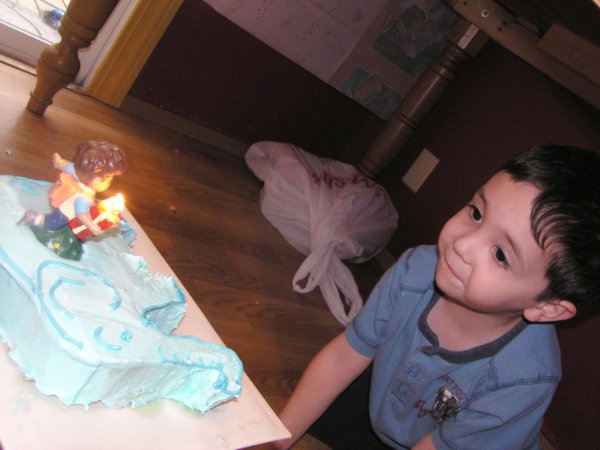
He loved it, but when people started singing he said it was too loud and dove under the table. Gran and I dove under, too, so he could blow out his candles and I could take pictures.

Next year, it was all about dinosaurs:

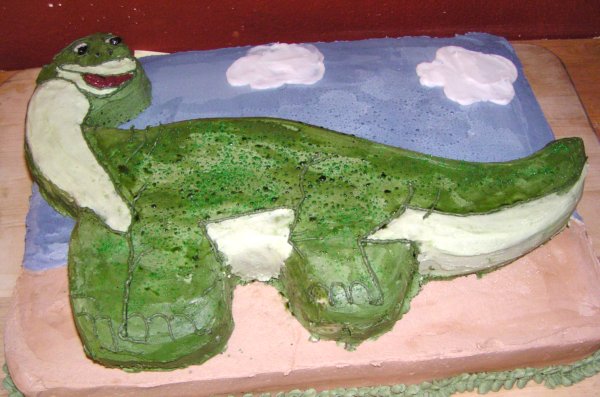
This was my husband’s first cake – seriously. He based his creation on a video from Betty Crocker.

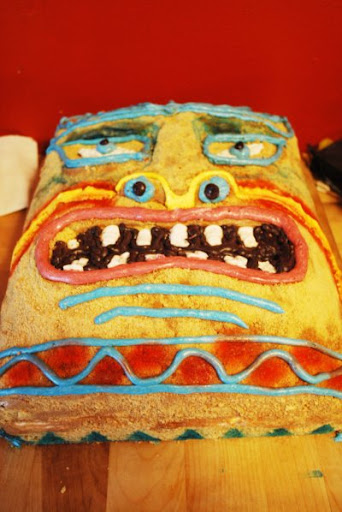
For our youngest’s luau party, he decorated this huge tiki cake:

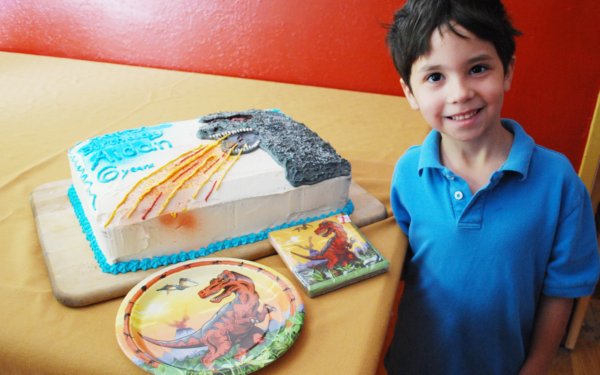
Last year, my oldest was obsessed with Godzilla, so dad obliged and made him a super awesome cake.

My boys totally appreciate what Daddy makes for them, and I sure appreciate having a talented husband and mother-in-law.

Are you the cake maker in your household?

Button Initial

I’ve seen this craft in various incarnations on the blogosphere and Pinterest, and given that I had a plain canvas and a ton of white buttons, I thought I’d give it a try.

However, I first painted the canvas because I didn’t want it to be off white, I wanted some contrast with the buttons. I chose a cheery yellow for my project, then used Gorilla Glue to add the buttons after tracing them from a fancy “B” I printed.

For now it’s on my office shelf but I have not yet decided where its new home will be. It’s the perfect shade for the upcoming spring and summer seasons so I think it might earn a place of honor on our mantel.

Hope you have a wonderful weekend!!

Weekend Bloggy Reading

A Valentine’s Day Exchange


I was thrilled to participate in a sweet gift exchange, hosted by the lovely Adrianne at Happy Hour Projects. She paired me up with Shannon from I’m Working on a Project – I was happy to discover that Shannon is a very talented quilter, which is the one craft I KNOW I have no patience for, so I am always amazed to see the care and time people spend to make their gorgeous quilts.

On Thursday the 9th I had just sent off Shannon’s goodies (bad bad blogger, I had meant to send them earlier!!!) when I came home to find a box waiting for me. It turns out Shannon is not only good at quilting with fabric but she does a mean paper weave too, check out this sweet card!

She was also thoughtful enough to send something for my boys – OMG, right??

My sons have never tried shrinky-dinks (and neither have I!) so I am totally looking forward to trying it with them.

This pretty bag — the blue is more turquoise in real life, she knows about my obsession with that color — is destined to hold my makeup 😀

Shannon also made me stationery in my favorite colors of turquoise and green:

My favorite gift (I loved them all, but check this one out) is this beautiful, quilted hanging piece:

It now hangs next to my desk as a reminder of the wonderful people I keep meeting online.

I am so thankful for all these sweet goodies, and for having met Shannon — if you want to see beautifully worked quilted pieces, definitely check out her blog – hope your Valentine’s Day is a wonderful one!

The next generation

My son is obsessed with making things.  I tell ya, the crafty gene is strong in this one 😀

He loves Legos and superheroes, so of course, he asked me to photograph his latest efforts:

That’s Spidey coming down, the dude with the big horns is Loki, the one with the Viking hat is Thor, of course, Hulk is in the back along with She-Hulk (which my husband painted for him), and I’d tell you the names of the rest except I don’t know half of them.

But I’m having a great time finding out.

And two days later . . .

OMG I can’t tell you how psyched I was to go in to visit my little seedlings and see that a few have started sprouting!!!

This morning there were about 4-5 little sprouts and this afternoon there were a whole bunch! These are the broccoli seedlings – they are getting some sun through my little one’s bedroom window, but my husband suggested we get some lights put up in the garage so the seedlings can have more light throughout the day and not be at the mercy of the cats. More on that next week!

Starting the seedlings


Last year I decided that I would start most of my garden from seed this planting season. First, there is so much more variety in buying seeds compared to the seedlings from the local stores. Don’t get me wrong, I have been super happy with our local purchases, but I wanted to try some more heirloom varieties. Second, it is much cheaper. Well, in this case, so far, my seeds have been free because they were given to me by many lovely people for my 40th birthday. See, I can type that now (40th birthday) and not sigh mournfully. Most of the time.

Anyway! I will still be purchasing potato sets because they were so delicious when we grew them last year. If I have space, that is, because one packet of seeds becomes quite a few seedlings. Even the rarer heirloom seeds, which only are about 25 seeds per packet, become about 8-12 seedlings, since you are supposed to do 2-3 seeds per slot.

As part of my birthday haul, I got a gift card with which I purchased a peat pellet starter tray. I knew it wouldn’t be enough for all the seeds I have that I needed to be started indoors, but I had also saved a couple of smaller trays last year and we had a few disposable containers. People start seedlings in cut-off plastic bottles or milk jugs, etc. so honestly, you don’t even need to get a starter tray like I did. I by no means pretend to be an expert at this, this is my first time starting most of my plants from seed and hopefully what I do will work, and I’ll share my triumphs and failures with you.

These are the seeds I needed to start indoors – a few tomatoes, eggplant, broccoli, onion, and bell peppers.

If you have a starter tray, then you need to soak the pellets.

They will expand and then you can add the seeds.

This whole tray was taken up by my tomato seeds. I took pics so I’d remember what was in each tray because I didn’t have labels ready 😀 The envelope straight up means one row, on its side means two rows, so this tray has 1 row of Super Sweet 100, 2 rows of Principe Borghese, 1 row of Black Krim, and 2 rows of Pink Brandywine.

Hopefully we will have lots of onion this year!

The rest of the onion seeds, peppers and eggplant

Broccoli

In a few weeks they should be ready to transplant, knock on wood. I have LOTS more seed packets, but they are to be started outdoors once the danger of frost is past. Around here, that means late February. However, we are going to be super busy so I have a feeling those babies will be planted in early March.

LOVE banner

I saw this sweet banner at Simple as That and knew I had to make something like it for my Valentine’s Mantel. Of course my turquoise obsession is permeating even this most “red” of holidays, but I figure, I can throw red somewhere else in the house. For now, this is what I came up with, based on Rebecca’s idea:

I went with scrapbook paper in an argyle pattern, some of the lines have glitter, which catches the light very nicely.

I layered turquoise hearts matted with white glitter cardstock. The hearts are topped with scalloped circles from the same white glitter cardstock and letter stickers spelling LOVE. The banner is “hung” from my fleur-de-lis candlesticks.

This banner can obviously be made in endless color/pattern/theme combinations, so I have a feeling there are more pretty banners in my future. Thanks to Rebecca for this great idea!